Showing posts with label Closet Crafting. Show all posts

October 23, 2014

Gift for My Husband

Many days go by, and I don't think about my husband.  That sounds harsh, but I feel that life is so crazy and we are so busy, that by the time I get home from work, I have just enough energy to plop on the couch and pass out.  

I miss our dates. I miss doing stuff with just him.  For his birthday, I decided to make something that we could enjoy together.  We often like to eat out - but seem to pick the same 5 places (all of which we love!), but there are so many interesting places we mean to try and forget about!

(Drum roll please!) I made him a Food Passport :)
I cut white paper in fourths, and then stapled them together like a book. I didn't count the pages, so basically I shoved as many pages I could without having the staples bust. On my lunch breaks, I drew many many lines on each page - so each page would house two restaurants. 

After asking everyone under the sun to list their favorite restaurants, and then looking up menus online - I compiled a lengthy list of 100-plus places to dine.  Some focus on a specific cuisine, others I picked because of its location or beautiful views.

Just like a passport, we stamp each restaurant square after visiting, leaving comments on our experience.

Signature

July 02, 2013

Last Summer's Conquest


I find myself obsessed with Pinterest - so much in fact, I have only allowed myself the hour before bed to look through the countless pages of recipes, crafts, home decor because I could literally waste away my entire day.
I saw a  fantastic piece of furniture - a cable spool table that I HAD TO HAVE.  It was my personal quest last summer. After researching how to obtain one without stealing it from a cable company, I posted my plea on Facebook, and a friend had in their garage, just taking up space :) They, too, had plans to make furniture out of it but life got in the way. She was happy to see it going to someone who would make it into a piece of love. Success! Who said social media was a waste of time? Not me! I picked it up, free of charge, and hauled it home.
It was a bit taller than I expected, but I didn't care - soon I would have my own spool table to organize some of my books.


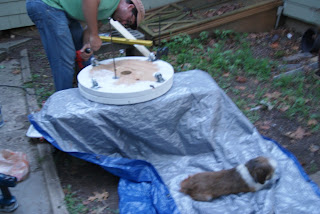
We sanded the table top down, and I painted it white.  

After painting, Mr. screwed on caster wheels on the bottom.  Though I don't have any intentions of pushing it around, it added a little industrial flair (or made it easier if I wanted to push it around:) 

We had our security dog sit watch, or sit and sleep. Wherever we told P NOT to sit, that's exactly where she planted herself. Crafty lil dog. 

I hemmed and hawed over whether the table was too high. Before putting the spindles on, we put it in the spot in the dining room. It was actually above the chair - not really good for a side table, as it came up to your chest in the chair.   But Mr. said it wouldn't be a big deal to disassemble it, and cut the middle planks. Well, I think if he realizes it would take three people to hold the sides together , I don't think he would have volunteered. He took apart the boards and cut off about six inches.    The biggest challenge was putting it back together! After a few grunts and curses, we were able to place the top back on.    
  We wheeled it in the dining room and Voolah! I couldn't fill it with books faster!
It looked better than I could imagine!

I placed my aloe plant (yes, it's still alive!), one of my favorite games- Mancala, and a picture of Little. An afternoon of sawing and painting, and I couldn't be happier! 

Total cost: $16
We got the spool for free and used old white paint from trim.
At Home Depot, we bought 4 caster wheels for $12 and two 6 foot long dowels for $4.


Signature

June 30, 2013

Let's Hear it for Organization!


I'm not sure about you, but my system for organizing bills seems to be a little (or rather large) pile on the table, until I am ready to go through them and pay.  When coupons come in the mail, or when I find recipes I like, they go in envelopes or piles. I just love my piles!  But I guess this doesn't work for everyone :)

I decided that I needed to come up with some sort of filing system that wouldn't topple over if you happened to touch it.  I bought a plain black filing box, and a bunch of hanging folders (multiple color). By jolly, I would do something cute!


I took a fancy fabric I had in the closet, and cut around the plain ole' container. Before I used my Mod Podge, I spray painted the whole container teal - and I LOVE this color!!! (so does my grass because there's a huge teal mark where I sprayed outside!)  After it dried,  I used Mod Podge to seal the fabric on it.  

I wrote out different folders: Bills to Pay, Papers to File (in either our safe or box in basement), Recipes to Try (and if I like it - it goes in cookbook or if not - gar-bage), Crafts to Make,  Date Night, Tax Forms (I am getting MUCH better about our taxes and now save all our receipts ), Blog Stuff, and Coupons. 


Now when mail comes in that I deem important, it goes right in the filing system.  As the month goes on, and it's time to pay the bills, I also go through the other folders (coupons to see what expired and so on).  
I try to make the recipes I cut out each month so I can make room for new ones.  
So far, this system has worked!  I absolutely love the colors and now if I leave it out by accident, it's not ugly!!


Signature

June 28, 2013

Melt Into Summer

Each summer starts out the same way(a paraphrase of multiple conversations leading up to the end of school): 
Me: What do you guys hope to do this summer?
Mr: I don't know.
Little(now Bigger): Something sports related.
Then I rattle off about 30 things I hope to get'er done, but then after 60 days of sun, totally forget about.  If only I had a LIST (yes. because I love my lists).  Wait - I make lists, oodles and oodles of lists, but then I lose them!  This laundry list needed to be out in the open if I wanted to actually finish everything I wanted.  
Last week, we sat down as a family and created activities to accomplish this summer. Instead of focusing only on trips which cost moolah, we also thought of things to do that fall into: Free Outdoor, Free Indoor, Crafty, and Food Related.

  During my prep periods this last week of work, I racked my little brain on how to display our Summer Bucket List. With over 50 activities planned (some free and some a little cash), I wanted to figure out a way to put it out there where we will be reminded to DO it.

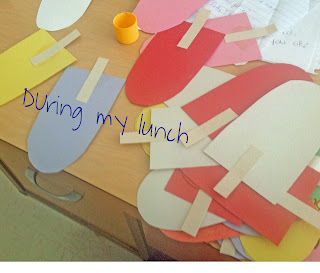
As temperatures in my classroom soared above 95 degrees, some of my students complained they actually felt their skin melting(gross image). Fantastic! Bingo! That was it! I cut out over 70 popsicles out of construction paper, and in my neatest teacher handwriting, wrote down the activities that I hoped we could accomplish throughout the summer. 


Before going home, I stopped at Michaels to pick up teeny tiny clothes pins to hang the popsicles  where we can see them. After showing Mr. the handful of popsicles, I enlisted him to help me hang the twine between the windows, and starting pinning them for display. I couldn't help but squeal as I watched him pin them! It was actually what I had hoped for!  


I just love the multiple colors! Here are some of the popsicles listed: Have an Unbirthday party (Little's birthday is in December so he never gets an outdoor event!), Hang with family, Meadowlands Flea Market, Mini golf, and Video Game day. 


At the start of the week, we will pick a few activities we hope to accomplish that week :)  Then move them to the chalkboard leaning against the wall on the cupboard.  After achieving each one, we check it off and write the date!  Mr. had a great idea to cut the edge so it looks like someone took a bite out of it :) 

We hung this up before I was done with school, but our official "Summer Bucket List" won't take place till I am out! Wahoo!  

What would you add to your summer bucket list?


Signature

July 06, 2012

Christmas gift comes out of the closet


Months ago I listed on my blog what I wanted for Christmas, in hopes that Mr. would read it and take the hint. Lucky for me, he did.  I scored BIG for Christmas.  One item I lusted after, intimidates me and delights me.  The Cricut. It was the talk of the town on Christmas day. My aunt also has one, and it is my uncle who uses it to make stars for my cousin's girl scout troups, hearts for the Valentine's Day dance.  I think with this new news, Mr. wanted to join in on the fun.  After watching the new Cricut sit on our couch for a month after Christmas, I decided to take it out of the box.  That was the first step.  A week later, I plugged it in...I wasn't sure what to do.  Mr. and I spent an entire afternoon playing with it - printing out signs and words.  I created a monster.  When I went updstairs, Mr. continued to print out COFFEE font.  He then discovered Modge POdge - and modge podged the words everywhere in our house, on every blank jar or canister.   Between the newly labeled "Flour" container, and the "Coffee" jar - I think if anyone is unclear where our loose pantry items are housed, they will have a clue now.

Fast forward five months......
After our initial Cricut party, we haven't used it since then.  I have deduced it is for two reasons: no space to keep it permanently. Every time I want to use it, I have to dig through a VERY cluttered closet for it, and then in a completely different area for paper.  My second reason, and probably main reason is I truly don't know what to do with it.

   If you are like me, too intimidated to use this machine, here are some ideas! Hopefully my summer will consist of some fun Cricut projects!
from Craftypod.com
found on hgtv.com
Found on Sewwoodsy.com


Hope you found some inspiration! I can't wait to dig up my machine and start something great! I don't know who is more excited about using it soon - me or Mr  :)


Signature
 

October 01, 2010

Blog Par-tay!

Today is October 1st, which kicks off my very first blog mini series!   We go all out for Halloween, and I thought why not have a party to celebrate!? For the next 31 days, I will be posting spooktacular Halloween projects. recipes, and decorating ideas. I will happily feature anyone who wants to join the party and show off their cauldron of macabre ideas! Let's swap em! Some thoughts: Homemade costume ideas,  yard decorations, party treats and favors, fun food and drink concoctions!


How To Participate?
Please link up to my party and grab the "31 Spooktacular Projects" party button, and spread the word of this spooktacular event!   Add your link to Mr. Linky anytime between October 1st -31st. Please provide link to your Halloween post :)  If you don't have a blog, email me the pics or idea! I will gladly post for you!   


(Please keep your fingers crossed that it works, as I've never used McLinky - and I'm really excited/anxious of what to do!)


Signature

September 30, 2010

Skip Halloween move to Christmas

Halloween? Yay!! Christmas? WHAT?! I can NOT believe when I went shopping last night, Halloween stuff was on clearance to make way for Christmas decor. I threw up in my mouth a little.  Then I went home, and fretted over what I am making/buying  for the holidays.


My friend received  an awesome gift  from her aunt after her recent wedding, a cookbook containing family recipes and memories.  After flipping through it - I would love to create the same tradition for my family.  Having six aunts, my mother, grandmother, and  cousins/sisters - we have dozens of favorite meals when it comes to the holidays/birthdays/family functions.  Why not create a binder to store all  of our family classics?


I searched the blogs (my favorite) for inspiration of how to set this project up.  Here is what I came up with:


Family Cookbook: Each page should contain a recipe, varied ideas and notes, and perhaps a picture of a family member taken within the last year(or perhaps what event the recipe is from!). However, I don't think each recipe will have a picture - because it might look too busy.  Each year (or every other year) I could continue to add to the binder, typing up new recipes that we've tried for that year and adding new pictures. I think using a large binder, divided into sections (appetizers, meat, desserts, etc.) would work.  Perhaps actually making use of the sheet protectors I have stored in the basement will make it spill proof? I'll have to figure out a system to date each recipe of when it was submitted so we know when it was added and who added them!  


Have to figure out how I am going to organize my recipes...and what program I am going to use to format them. I sent an email to nine women in our family, and asked them for their top 5 favorite recipes, or what they are known for (what people request most often).  I didn't give them any hints of why I needed them, as I wanted to make it a surprise.  I am thinking that for the first year, I won't add too many pictures or stories because I would rather people add what they want without letting on to what I am creating for Christmas.  

Any suggestions on how to create this? 


Signature

September 04, 2010

Please Please Please Let me get what I want

After staying up the wee hours by myself, with company of my dog (she is a great sidekick), I just decided what I need. I want. I must have.


A cricut. After this realization, I ran up the stairs to whisper this in my husband's ear while he was sleeping, so I hope he dreams of it!  But I said it fast and low so maybe he will subconsciously dream of crickets - sounds somewhat like my new lust! Right now it is on sale for a whooping $97 at AC Moore! Which is more than half price!
I don't know what exactly I would do with this machine - but it seems every blog I read, the bloggerette (yes. I made that word up) has one! And she creates beautiful projects!  


Hopefully, I will continue whispering sweet nothings of craft machines in my husband's ear, or I will just take matters into my own hands!  

What kind of projects have you made with this pretty little thang? Leave a comment with your link!


Signature

September 03, 2010

My life is a green door


My life is on a door. Literally. The green door in our kitchen leads to our basement.  On the inside of the door contains our calendar, cleaning schedule, Little's chores, and now the latest edition of my crafty endeavors.  Today was the first day I used Mod Podge.  (Some may be shocked by this statement). Yes, I have never used mod podge before.  It seems that all the papers from school come home and then POOF. I don't know where they go!  Tonight over 10 different announcements came home, and I decided enough was enough! Last year I put the papers in a folder, but then  neglected to look at the folder (oops!)


After picking out "sport" paper from Michaels, and looking high and low for a plain clipboard - I figured out my project for the evening.


  I to mod podged (I just love saying that!) the clipboard with the sports paper and then let it dry for 20 minutes - actually more like 10 minutes because it was so hot in my house, it dried fast.  I was a little worried at first because I didn't know if my streaks of white m.p. would turn clear!
Let's hear it for Mod Podge!!


I  hung it on our organized door.  This would be next to the calendar, cleaning schedule, Little's star chore chart.  Therefore, it would be right where we look everyday! 


Signature

June 14, 2010

Monday monday

The dreaded B word. I loathe the word. I'll whisper it to you know what I mean...I hate the word bored. AH. I hate even typing it! I am as a child, I may have tossed that word around a time or two, but I am finding that more and more kids can not seem to occupy themselves! What gives?!

This summer I am hoping to get alot of projects done that perhaps fell by the wayside this year. We also have planned a lot of fun day trips, but certainly not one for every day! Therefore, it is up to Little to occupy himself when we are not entertaining him with circus events, fairs and carnivals, and museum trips. Following me around the house looking mopey is NOT a friendly experience!

What I like most about this is that some of the activities are clearly CHORES.

And I don't know what is stopping a child from just picking again till they get something they want to do.....like play video games. hmmm. This is something I need to think about.Somewhat Simple created a "Bored Jar" and I really like its presentation (which is everything!).

The idea is to come up with a list of things to do, fun and not-so-fun, so when the child is feeling bored, they can entertain themselves. The list that I came up with has over 20 activities, though some of them are repeated (like dusting and cleaning!). Below is an example of the lists I am using for the jar.


Another blog that had a fabulous "Bored Jar" was KMcKay Designs. The fonts she uses are so darn cute! She also has a ton of other fun activities for kids to make - if you want to check it out!

Summer has never been so crafty!!


January 29, 2010

Library Fines Be Gone!

After stumbling upon a new website (I feel like I say that alot!), I found a very creative way to display and keep track of library books and their said due dates.

Shell in Your Pocket had this wonderful idea that combines a few of my favorite things (not when a dog bites or bee stings!). All you need is a study basket, chalkboard, wood paint, brush, letters, ribbon, and a glue gun (the only gun I love!)

I visited the Christmas Tree Shoppe this past weekend with my mom and found the most fitting basket for this project. It is made out of old newspaper - how appropriate for reading!

This is the Library Basket from Shell in your pocket....I will post my project when it's finished!


Till then....Happy reading - with no fines!

Signature

January 05, 2010

Bags of Organization

The mail comes in....and the mail should go out. However, it gets lost in the madness of our home. How do we solve this problem? Since Mr. is against my plastic bag organization - I stumbled upon a pattern for mail sorting. I love it. The problem is where in the world will we hang this project?
I love where they hung this too. the back of the door! It is functional yet not in the way! perfect-o. Now, how to create it? I can not take any credit for this creation, but I can tell you where I found it. Bright and Blithe has the tutorial, which is pretty straight forward. As soon as I rescue my sewing machine from the pitfalls of our bedroom, I will definitely get started on this wonderful bit of organization.

Hopefully soon I will be able to post pics of my own mail sorter, till then it will have to suffice looking up photos of other people's completed projects!

My only other bit of longing stems from my need to organize our gift cards and coupons. I had a paper "coupon" holder, yet after a few wears and tears, it did just that. It wore. It tore. And all my gift cards slipped out all over the floor :(

I would pay a pretty penny (and maybe a not so pretty penny) to have something that clearly organizes our cards/coupons. I have seen two different types on Etsy that I simply love.
I sew on Etsy has the cutest coupon holders, and they actually seem pretty darn sturdy! They come either already made ($32), or she also offer the sewing pattern for an easy payment of nine dollars! That isn't too shabby!

With these two ideas on my hands, I am hoping I can wipe the dust off of my sewing machine, and get right to work! Happy organizing!!

Signature